|
|
|
|

|
The Michigan Occupational Safety and Health Administration strives to work collaboratively with employers and employees to better prevent workplace injuries, illnesses and fatalities and to protect earned wages and fringe benefits. MIOSHA health and safety activities include: setting and enforcing occupational safety and health standards; providing extensive safety and health training and education; and working with partners to develop innovative programs to prevent workplace hazards. MIOSHA Wage & Hour activities focus on administration of three laws which protect the wages and fringe benefits of Michigan's workers. All agency activities focus on meeting the MIOSHA mission to help protect the safety, health, earned wages and fringe benefits of Michigan workers.
|
Safety Training for Television
Links:
Film Set Safety - Do's and Dont's
Extreme Safety - State of Michigan
Focus of Safety in Film & Television
Lighting Safety - Videomaker
Film Set Safety - Do's and Dont's
Extreme Safety - State of Michigan
Focus of Safety in Film & Television
Lighting Safety - Videomaker
Clothing and Footwear
Health & Safety
Television Studio Policies
TV Studio Area Procedures
STUDIO SETS AND PROPS
There are various sets and props in the studio that you may use for your studio productions. None of these sets or props are allowed to leave the studio. Safety Guidelines for Set Moving Whether moving a panel set or a riser, follow these instructions. ALWAYS FOLLOW THE GENERAL HEALTH AND SAFETY RULES LISTED IN THE BEGINNING OF THIS DOCUMENT. Anyone who disobeys these rules will be corrected or prohibited from moving studio sets.
STUDIO CAMERAS
The TV Studio has three studio cameras for your production use. These cameras are permanently patched in to our control room. Please follow the rules below for camera and student safety. Further instruction about the speci c operation of each camera is given in studio demos.
Safety Rules:
STUDIO AUDIO
Located next to the door to the control room, there is a pillar with six XLR inputs for audio connection. This is
where you connect your microphones and the audio feeds into the control room from here.
Studio Audio Safety:
TV STUDIO CONTROL ROOM
The Studio Control room is located in a side room attached to the main studio. Most instruction for the operation of this room and its equipment is given during studio demos. However, for your safety and reference, here are the basic safety rules.
Control Room Safety Rules
- Do not wear anything with fringe or hanging material that might get caught on equipment as you are trying to move something and might cause an accident.
- Wear closed toe, non-conductive shoes. Sneakers or a solid pair of boots are best. Anything with open toes or that can conduct electricity is not permitted. This prevents injuries while equipment is being moved and protects you from being electrocuted.
Health & Safety
- NEVER MOVE ANYTHING BY YOURSELF. Most of the equipment in the studio is very large and heavy. Avoid back strain or other bodily harm by working with a partner.
- NEVER MOVE ANYTHING IF YOU HAVE PREVIOUS INJURIES. If you have pre-existing back injuries, other physical injuries, or health issues that may be aggravated by moving an object, notify the TV Studio Coordinator, and do not move anything.
- FOLLOW ALL SAFETY DEMO INSTRUCTIONS FOR LIFTING AND MOVING OBJECTS. This will decrease the risk of injury.
Television Studio Policies
- Keep all food and drink in the designated areas. Food is banned on the main floor of the studio during production, practice, or prep. Food causes distractions and may cause hazards if dropped or spilled.
- Keep all exits free of obstruction and keep belongings in a designated area out of the way of the main studio oor area. We don’t want anyone tripping over belongings and we always need a clear path to the exits.
- Turn off all cell phones or other electronic communication devices, or set them to silent or vibrate mode. Please follow this rule so productions will not be disrupted by unexpected sounds.
TV Studio Area Procedures
STUDIO SETS AND PROPS
There are various sets and props in the studio that you may use for your studio productions. None of these sets or props are allowed to leave the studio. Safety Guidelines for Set Moving Whether moving a panel set or a riser, follow these instructions. ALWAYS FOLLOW THE GENERAL HEALTH AND SAFETY RULES LISTED IN THE BEGINNING OF THIS DOCUMENT. Anyone who disobeys these rules will be corrected or prohibited from moving studio sets.
- Never move anything on your own.
- Don’t move anything if you have pre-existing injuries or medical conditions that may be aggravated.
- Always lift from the knees.
- Never twist when carrying something of substantial weight. Rotate your entire body to avoid back strain.
- Always use the provided safety equipment when moving anything, including gloves, lift straps, back braces, and so on.
- Always make sure that sets are safely secured in place. Follow the instructions of the Studio Coordinator for these procedures.
STUDIO CAMERAS
The TV Studio has three studio cameras for your production use. These cameras are permanently patched in to our control room. Please follow the rules below for camera and student safety. Further instruction about the speci c operation of each camera is given in studio demos.
Safety Rules:
- 1) NEVER DETACH A CAMERA FROM ITS TRIPOD. Each camera is set up in a specific way. Detaching a camera disrupts the functionality of the camera and its connection to the control room. Detaching a camera is also a safety hazard for students and for the camera (it risks dropping the camera).
- NEVER TOUCH A CAMERA LENS! Lenses are sensitive. If there is a problem with a lens, notify the Studio Coordinator.
- NEVER ADJUST A TRIPOD ON YOUR OWN! The Studio Coordinator MUST BE PRESENT to instruct you and your fellow students on how to safely adjust a tripod according to what camera it sits on. Instruction is provided on an “as needed” basis, controlled by the Studio Coordinator.
- NEVER BALANCE A CAMERA ON YOUR OWN! Camera 2 in the TV Studio is the only camera that has the ability to be balanced properly. Do not attempt this procedure without the supervision of the Studio Coordinator. The Studio Coordinator will conduct this procedure while guiding students on how to assist. There must be at least 2-3 people to balance this camera.
STUDIO AUDIO
Located next to the door to the control room, there is a pillar with six XLR inputs for audio connection. This is
where you connect your microphones and the audio feeds into the control room from here.
Studio Audio Safety:
- Please be mindful of the plug you connect your audio cords into. If there is anything suspicious like a funny smell or sparks, notify the Studio Coordinator at once. This could mean that a plug died and might be a re hazard.
- Make sure that the audio cords from the pillar to the talent are safely out of the way from people tripping on them. If you need, ask the Studio Coordinator for gaffer tape to fasten down the cords.
TV STUDIO CONTROL ROOM
The Studio Control room is located in a side room attached to the main studio. Most instruction for the operation of this room and its equipment is given during studio demos. However, for your safety and reference, here are the basic safety rules.
Control Room Safety Rules
- KEEP ALL EXITS AND PATHS CLEAR. Never leave purses, bags, backpacks, and so on in the way of the exit doors or the main pathway.
- Report all technical problems. Never try to x it yourself. If there is a problem, report it to the Studio Coordinator immediately.
- NEVER MESS WITH THE CAMERA SETTINGS! If there is a problem with one of the studio camera controls, notify the Studio Coordinator.
- Always turn all audio from the studio to zero BEFORE plugging or unplugging microphones, and BEFORE turning everything off. This keeps the speakers from blowing, fuses from popping, and ear drums from bursting.
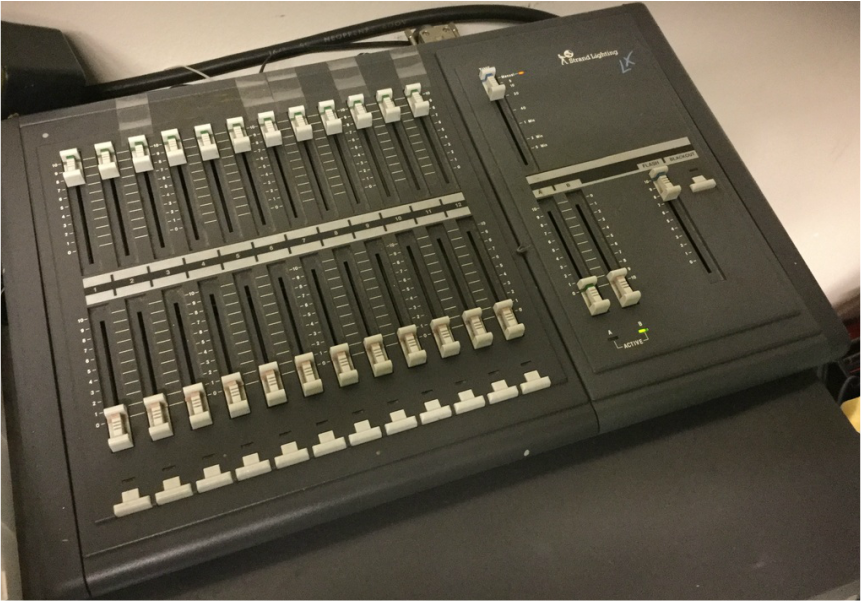
STUDIO LIGHTING
The lighting grid is controlled by the 12 input lighting panel located by the main entrance of the studio. Here are a few tips and safety rules for you to follow.
Studio Lighting Grid Operation:
1) To turn on the grid:
2) To work the lights: The person at the lighting grid panel is the Lighting Director. The assistant must be on the floor calling out the numbers of the grid plugs that have lights plugged into them. The assistant also helps move the lights
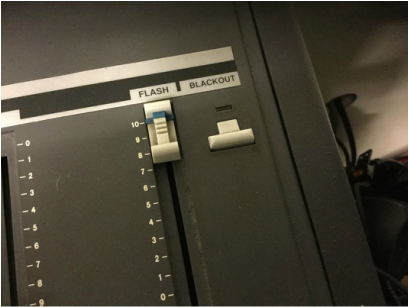
3) To turn off the grid: IMPORTANT: Before you shut down the lighting grid, make sure that all the lights are turned down to zero. Another option is using the Blackout Button on the right side of the lighting board.
The lighting grid is controlled by the 12 input lighting panel located by the main entrance of the studio. Here are a few tips and safety rules for you to follow.
Studio Lighting Grid Operation:
1) To turn on the grid:
- a) Make sure the main power is turned on in the camera closet
- b) Press the "Blackout" button located on the right of the board
- c) Press the black out button to start the system. Bring the faders up to increase and decrease the amount of light on set. These numbers coincide with the light plugs on the ceiling grid.
2) To work the lights: The person at the lighting grid panel is the Lighting Director. The assistant must be on the floor calling out the numbers of the grid plugs that have lights plugged into them. The assistant also helps move the lights
- When the assistant calls out a number for a light, push the fader to the ON position on the lighting grid panel.
- Push the “Up” button to bring up a light.
- TIP: Never use the lights on FULL (100%). That’s way too hot!
3) To turn off the grid: IMPORTANT: Before you shut down the lighting grid, make sure that all the lights are turned down to zero. Another option is using the Blackout Button on the right side of the lighting board.
|
|
STUDIO LIGHTING EQUIPMENT
The large, metal rolling stairs in the studio are used to access lights on the lighting grid. This apparatus is mainly used by the Gaffer, Key Grip, and Grips in a production. Follow the safety instructions below to use this piece of equipment.
The large, metal rolling stairs in the studio are used to access lights on the lighting grid. This apparatus is mainly used by the Gaffer, Key Grip, and Grips in a production. Follow the safety instructions below to use this piece of equipment.
- Follow the clothing regulations! NEVER wear conductive shoes or clothing when operating this piece of equipment. It is assumed that the people operating this equipment will be in contact with the studio lights and possibly the grid. If you do not wear proper clothing, you risk electrocution.
- ALWAYS WEAR SAFETY GLOVES! This is a METAL staircase — a conductive material. Wearing the gloves and proper clothing and footwear will ground you, preventing you from electrocution.
- ALWAYS WEAR SAFETY GLASSES. All Grips, Gaffers, and Key Grips are required to wear safety glasses when working in close proximity to the lights and the lighting grid. This protects eyes from accidents such as a bulb shattering while a light is being moved.
- NEVER move the stairs when someone is on them!
- Move with two people. This is a large piece of equipment and must be moved by two people. One person at each end of the staircase makes moving easier.
- Always move the stairs directly under the light that needs to be worked on. Do not move the stairs so far away that the person must lean over the railing. This is dangerous and the person can fall and hurt themselves.
- KEEP ALL OTHERS CLEAR OF THE STAIRS AND WORK AREA WHEN IN USE. When working with the stairs, all other people in the studio should maintain a safe distance away from the stairs. A safe distance is de ned as at least ve to ten feet from the main work area. This prevents people who do not have protective gear from touching the stairs. It also prevents them from being in a hazardous area if a light should fall.
- Always hold the rail when climbing up and down the stairs. When climbing down the stairs, “back down” facing the stairs.
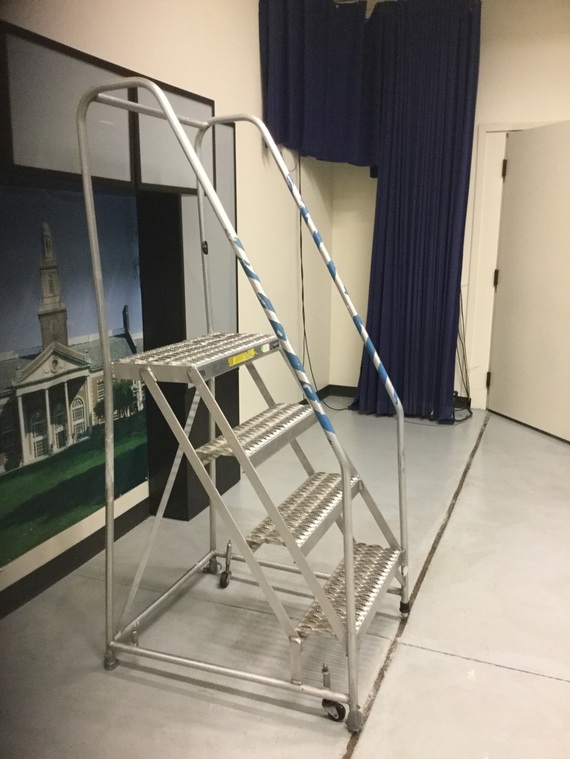
STAIR OPERATION:
Moving/Setting Lights Each production requires different stage lighting. In most instances, students will have to move and re-angle lights to meet their specific production needs. Demos for safety and techniques to move and set lights are provided each quarter. For your reference, please pay attention to the safety rules and procedures below when moving or setting a light.
General Safety Rules:
- TURN OFF THE GRID BEFORE YOU CLIMB THE STAIRS, TOUCH LIGHTS, or MOVE LIGHTS. This is a very important safety precaution for the lives of our students and staff.
- Follow the clothing regulations! NEVER wear conductive shoes or clothing when moving and setting lights. Even though the grid is turned off, there may be some residual power. Decrease the risk of being shocked or electrocuted!
- ALWAYS WEAR SAFETY GLOVES! If the lights on the grid have been on prior to moving and setting them, they will be HOT! Do not touch the lights without gloves. Gloves also protect you from being shocked or electrocuted when plugging and unplugging lights.
- ALWAYS WEAR SAFETY GLASSES. All Grips, Gaffers, and Key Grips are required to wear safety glasses when working in close proximity to the lights and the lighting grid. Safety glasses protect eyes from accidents such as a bulb shattering while a light is being moved.
- NEVER TOUCH THE BULBS. Fingers leave residue that can shatter bulb when it heats up and can cause an accident. If a bulb goes out, notify the Studio Coordinator. Do not attempt to change it yourself.
- Never descend the ladder with a light in your hand. Doing so may throw off your balance and cause you to fall. Always have a Grip ready, sitting midway on the stairs, to take the light from you and pass it to another Grip at the bottom of the steps.
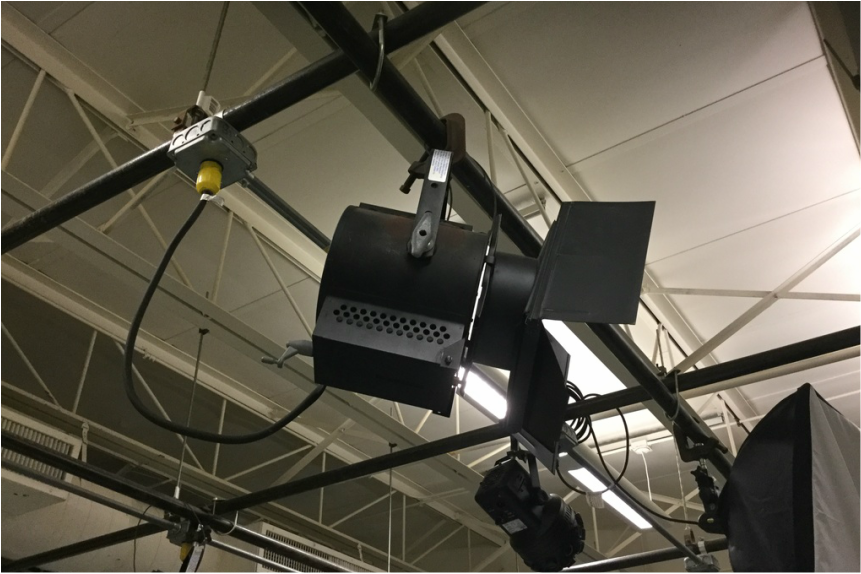
Moving a Light:
When moving and setting lights, make sure the Gaffer, Key Grip, and Grips pay attention to the numbers and positions of the plugs, as well as the black beams the lights hang from. Follow the methods below to move a light. Keep a pair of pliers handy in your pocket when working.
Taking down a Light / Moving a Light:
Setting up a Light:
Angling a Light:
When moving and setting lights, make sure the Gaffer, Key Grip, and Grips pay attention to the numbers and positions of the plugs, as well as the black beams the lights hang from. Follow the methods below to move a light. Keep a pair of pliers handy in your pocket when working.
Taking down a Light / Moving a Light:
- Choose the appropriate light and the location you need to move it to.
- If the light is mounted, make sure the stairs are directly below the light and locked.
- Climb the stairs safely to get to the light.
- Loosen the main C-clamp holding the light to the black beam. You may need the pliers.
- Take a rm grip on the light handle and unhook the safety chain.
- With both hands, take the light off the black pole, rotate your body, and carefully hand the light down to the Grip waiting midway on the stairs.
- Pass the light down to the Grip at the bottom of the stairs.
Setting up a Light:
- Position the stairs directly under the area you need to work in (i.e. where you need to plug and mount the light on the grid).
- The Gaffer climbs the stairs first. Followed by a Grip who positions himself sitting midway on the stairs. A third Grip positions himself with the light a the bottom of the stairs. The Grip at the bottom passes the light to the Grip sitting midway, who then passes the light to the Gaffer at the top of the stairs.
- With both hands, place the light on the black mounting pole.
- Hold the light with one hand and tighten the screw of the C-clamp with the other. Use the pliers to make sure the light is tightly fastened to the pole.
- Attach the safety chain. Make sure you loop the chain through the light and around the pole. This will prevent the light from falling on someone if the C-clamp fails.
- Plug the light into the designated plug.
Angling a Light:
- Slightly loosen the handle or the screw located on the right or left of the light. You might need pliers.
- Follow the directions given by the Key Assistant on the ground and tilt or swivel the light accordingly.
- Tighten the handle or screw to x the light in the new position.
- Adjust the Barn doors as needed
